
First Look Into Writing Unit Tests in React
September 21st, 2022 — 14 min read — Gideon Idoko
Software testing is a concept that is almost as old as software itself. The term "software testing” refers to the process of verifying that a software program functions as it is intended to. Software testing helps us identify bugs in software. Identified bugs are then removed or corrected via the process of debugging.
Unit and integration testing are the most basic and popular types of software testing. While unit testing asserts that the functionality of a small part or individual components of an application is working fine, integration testing ensures that the unique pieces still work fine when integrated together.
In this article, we’ll briefly look at the classification of software testing. Using tools like Jest and the React Testing Library, you’ll learn how to write unit tests for React applications.
Prerequisite
Basic knowledge of React and TypeScript would help as you go through this article.
Classification of Software Testing
There are different types of software testing, and they are broadly but not exhaustively classified under two categories: functional and non-functional testing. Functional testing ensures that features or functionalities of software work well. Non-functional testing, however, ensures that other aspects of software work well. The image below shows a high-level classification of software testing:

Classification of Software Testing [source]
Unit testing is a type of automated functional testing*—*performed by a machine that executes test scripts. If you’re not writing automated tests for your application, then you’re doing manual testing, i.e. testing your application with your hands and without the aid of testing tools or code. Manual testing can be extremely time-consuming, especially in large applications, as every app functionality has to be tested after any feature is added or bug fixes are made. This makes writing automated tests a crucial part of any software development workflow.
Getting Started
Unit and integration tests in React are done with the same tools. Below are some of the most popular React unit testing tools:
- Jest: A testing framework or test runner recommended by the React team.
- React Testing Library: A set of React DOM testing utilities recommended by the React team for testing React components without relying on their implementation details. This library is built on top of the DOM testing library and hence re-exports everything from it.
- React Test Renderer: Enables the rendering of React components to pure JavaScript objects without depending on the DOM.
Basic Setup
Create React App (CRA) ships with a configured Jest and React Testing Library setup. If your project is bootstrapped with CRA, you’re all set to start writing tests.
Bootstrap a React app with CRA:
npx create-react-app test-demo-ts --template typescript
Spin up the newly created React app’s server:
npm start
A peek in the src directory of your React app will reveal an App.tsx file and a corresponding App.test.tsx test file. Test files can either be named with a .test.ts, test.tsx, spec.ts, or .spec.tsx extension, or collectively stored in a __test__ directory. It’s best practice to keep your test files as close to what you’re testing in your project, just like the App.tsx file and its test file.
Jest Globals
Jest provides some global methods and objects that are in scope within every test file. You don’t have to import these globals to use them. Below are some of the most commonly used ones:
it(name, fn, timeout): This is a method that wraps test logic in it.nameis the name to be given to the test,fnis the function that has the test logic in it, whiletimeoutis the time (in milliseconds) for the test to run before it is terminated.test(name, fn, timeout): This is an alias forit()which can be used interchangeably with it.describe(name, fn): This method is used to group similar tests (it()ortest()) together into test suites.expect(value): This method is used every time you want to test a value. The jest-dom package adds special methods or matches that assert the state of the DOM to this method.jest: This is an object that provides helper methods for mocking and tracking objects or methods.beforeEach(fn, timeout): This is a method that runs the function passed as the first argument before each of the tests in a file runs.afterEach(fn, timeout): This is the opposite ofbeforeEach()as it runs the function passed as the first argument after each of the tests in a file runs.
Basic Tests
The most basic test in a React app is one that checks if a component renders successfully or not. Open the src/App.tsx file to reveal the App component as below:
import React from 'react';
import logo from './logo.svg';
import './App.css';

function App() {
  return (
    <div className="App">
      <header className="App-header">
        <img src={logo} className="App-logo" alt="logo" />
        <p>
          Edit <code>src/App.tsx</code> and save to reload.
        </p>
        <a
          className="App-link"
          href="https://reactjs.org"
          target="_blank"
          rel="noopener noreferrer"
        >
          Learn React
        </a>
      </header>
    </div>
  );
}

export default App;
Open the src/App.test.tsx file to see the test code as below:
import React from 'react';
import { render, screen } from '@testing-library/react';
import App from './App';

test('renders learn react link', () => {
  render(<App />);
  const linkElement = screen.getByText(/learn react/i);
  expect(linkElement).toBeInTheDocument();
});
The render() method renders the component which it takes as the first into a container which is appended to document.body. The screen object has a list of queries for querying document.body.
render() renders the App component in the test code above and fails the test if the rendering was not successful. screen.getByText(/learn react/i) fetches the element with a text node that has its textContent matching the text “learn react” and fails the test if more or less than one element is found. expect(linkElement).toBeInTheDocument() asserts whether the element found is in the DOM or not.
Run npm test in your terminal to launch Jest in watch mode. You’d see a list of options; press “a” to run all the test files. You should see the result below when the tests are completed:
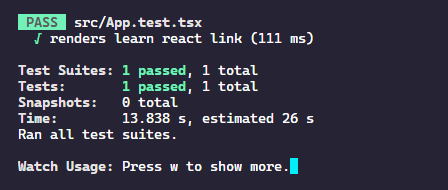
Here, Jest is running in watch mode, and tests will be re-run whenever you make changes to your code.
Arrange-Act-Assert
Arrange-Act-Assert is a style guide on how to organize and format unit testing code. The pattern is as follows:
- Arrange all the necessary preconditions and inputs, for example, rendering a component.
- Act on the object or method under test, for example, firing an event on a DOM element.
- Assert that the expected results have occurred, for example, checking if an element is in the DOM tree.
NB: Try to separate these sections with blank lines or comments.
Now, let’s move on to see other test cases that you’d likely encounter when testing your React app.
Testing user interaction and state change
One common thing to test in a React app is the state of the app after some user interactions are done. Let’s look at a dummy toggle app that displays a simple text message (toggle state) when its toggle button is clicked.
Update the App component with the code below:
import { useState } from 'react';

function App() {
  const [isToggleOn, setIsToggleOn] = useState<boolean>(false);
  return (
    <div className="App" style={{ textAlign: 'center' }}>
      <h1>Toggle {isToggleOn ? 'ON' : 'OFF'}</h1>
      <button onClick={() => setIsToggleOn((prevState) => !prevState)}>Toggle</button>
    </div>
  );
}

export default App;
On the initial render of the App component, the h1 element should have a text of “Toggle OFF” that should change to “Toggle ON” when the toggle button is clicked. An automated test can be written to verify the aforementioned behaviour.
Update the src/App.test.tsx file with the below test code:
import { render, screen, fireEvent } from '@testing-library/react';
import App from './App';

describe('Toggle Test', () => {
  test('h1 flags ON toggle is clicked', () => {
    // ARRANGE
    render(<App />);

    // ACT
    // get the element which textContent matches 'Toggle' i.e the toggle button
    const toggleButton = screen.getByText('Toggle');
    // click on the toggle button
    fireEvent.click(toggleButton);

    // ASSERT
    // get the h1 element in the DOM. h1 has a role of 'heading'
    const h1Element = screen.getByRole('heading');
    // assert the textContent of the h1 element to be
    expect(h1Element).toHaveTextContent('Toggle ON');
  });

  test('h1 flags OFF toggle is clicked twice', () => {
    // ARRANGE
    render(<App />);

    // ACT
    const h1Element = screen.getByRole('heading');
    const toggleButton = screen.getByText('Toggle');
    fireEvent.click(toggleButton);
    // click on the toggle button the second time
    fireEvent.click(toggleButton);

    // ASSERT
    expect(h1Element).toHaveTextContent('Toggle OFF');
  });
});
The describe() method is used to wrap the two test cases above since they are similar in a single test suite. Run npm test in your terminal to see the output of the above test cases.
Mocking and Testing Asynchronous Code
Another thing worth testing is the behaviour or state of your React app after an asynchronous action like data fetching is performed. Let’s look at the scenario of an app that uses the browser fetch API to fetch users’ data from an external API (in this case, a fake API*—*JSONPlaceholder) and displays the users’ names in unordered list items on the initial page render.
Update the App component with the code below:
import { useState, useEffect } from 'react';

interface User {
  id: number;
  name: string;
  [key: string]: unknown;
}

function App() {
  const [users, setUsers] = useState<User[]>([]);

  useEffect(() => {
    fetch('https://jsonplaceholder.typicode.com/users')
      .then((res) => res.json())
      .then((data) => setUsers(data));
  }, [])

  return (
    <div className="App" style={{ textAlign: 'center' }}>
      <h1>List of users</h1>
      <ul>
        {users.map((user, idx) => (
          <li key={idx}>{user?.name}</li>
        ))}
      </ul>
    </div>
  );
}

export default App;
You may want to verify that the list items were rendered after the call was made. This behaviour can also be verified via an automated test. The fetch request should be mocked in the test to prevent the test from hitting the endpoint, as this can cause unwanted data in the case of a POST request and so on. The jest global object provides a spyOn that tracks calls to defined methods, for example, the fetch method that is available globally.
Update the src/App.test.tsx with the test code below:
import { render, screen } from '@testing-library/react';
import App from './App';

const fakeUsers = [
  {
    id: 1,
    name: 'Leanne Graham',
  },
  {
    id: 2,
    name: 'Ervin Howell',
  }
]

afterEach(() => {
  // restore the spy created with spyOn
  jest.restoreAllMocks();
})

it('renders user data eventually', async () => {
  // ARRANGE
  // override global fetch with a mock implementation
  jest.spyOn(global, 'fetch').mockImplementation(() =>
    Promise.resolve({
      json: () => Promise.resolve(fakeUsers),
    }) as Promise<Response>
  );
  render(<App />);

  // ACT

  // ASSERT
  // get all list items in the DOM
  const listItemElements = await screen.findAllByRole('listitem');
  // assert that there are only two list items in the DOM
  expect(listItemElements).toHaveLength(2);
  // assert that the textContent of the first list item is same as the name first fake user
  expect(listItemElements[0].textContent).toBe(fakeUsers[0].name);
});
The findAllByRole() method helps in dealing with asynchronous code, as in this case. It keeps querying the DOM if it doesn’t find an element until the query returns successfully or times out. Run npm test in your terminal to see the output of the test.
Mocking Modules
You can also mock modules or packages that you don’t want your test to directly call using the mock method of the jest global object. Let’s replace the browser fetch API implementation in the previous example with that of Axios’ and mock it in the test code.
Install the axios package:
npm install axios
Update the App component with the code below:
import { useState, useEffect } from 'react';
import axios from 'axios';

interface User {
  id: number;
  name: string;
  [key: string]: unknown;
}

function App() {
  const [users, setUsers] = useState<User[]>([]);

  useEffect(() => {
    (async () => {
      const res = await axios.get('https://jsonplaceholder.typicode.com/users')
      setUsers(res.data);
    })();
  }, [])

  return (
    <div className="App" style={{ textAlign: 'center' }}>
      <h1>List of users</h1>
      <ul>
        {users.map((user, idx) => (
          <li key={idx}>{user?.name}</li>
        ))}
      </ul>
    </div>
  );
}

export default App;
Update the src/App.test.tsx with the test code below:
import { render, screen } from '@testing-library/react';
import axios from 'axios';
import App from './App';

const fakeUsers = [
  {
    id: 1,
    name: 'Leanne Graham',
  },
  {
    id: 2,
    name: 'Ervin Howell',
  }
]
// mock axios module
jest.mock('axios');

it('renders user data eventually', async () => {
  // ARRANGE
  // override the axios get method with a mock implementation
  (axios as jest.Mocked<typeof axios>).get.mockImplementation(() =>
    Promise.resolve({
      data: fakeUsers,
    })
  );
  render(<App />);

  // ACT

  // ASSERT
  // get the h1 element in the DOM
  const listItemElements = await screen.findAllByRole('listitem');
  // assert that there are only two list item in the DOM
  expect(listItemElements).toHaveLength(2);
  // assert that the textContent of the first list item is same as the first fake user name
  expect(listItemElements[0].textContent).toBe(fakeUsers[0].name);
});
Run npm test in your terminal to see the output of the above test.
Snapshot Testing
Snapshot testing involves taking a snapshot of a piece of code and comparing it to a reference snapshot file. This kind of testing helps to ensure that your UI does not change unexpectedly. A snapshot test will fail if two snapshots (the reference and current) differ.
The axios call was made on the initial rendering of the App component in the previous example. To look at how snapshot testing works, let’s create a separate button component that triggers the call.
Create a LoadBtn.tsx file in the root of the src directory and add the below code to it.
import React from 'react'

function LoadBtn({ children, ...restProps }: React.DetailedHTMLProps<React.ButtonHTMLAttributes<HTMLButtonElement>, HTMLButtonElement>) {
  const defaultBtnStyle = {
    border: 'none',
    backgroundColor: '#1bbbac',
    borderRadius: 5,
    boxShadow: 'inset 0 0 8px #777',
    cursor: 'pointer',
    fontWeight: 700,
    fontSize: 20,
    padding: '0.5rem 1rem',
    margin: '1rem',
  };
  return (
    <button {...restProps} style={{ ...defaultBtnStyle, ...restProps.style }}>{children}</button>
  )
}

export default LoadBtn;
The LoadBtn component basically returns a customized button. Update the App component to include it as so:
import { useState } from 'react';
import axios from 'axios';
import LoadBtn from './LoadBtn';

interface User {
  id: number;
  name: string;
  [key: string]: unknown;
}

function App() {
  const [users, setUsers] = useState<User[] | null>(null);

  const fetchUsers = async () => {
    const res = await axios.get('https://jsonplaceholder.typicode.com/users')
    setUsers(res.data);
  };

  return (
    <div className="App" style={{ textAlign: 'center' }}>
      <LoadBtn disabled={!!users} onClick={() => !users && fetchUsers()}>Load Users</LoadBtn>
      <h1>List of users</h1>
      <ul>
        {Array.isArray(users) && users.map((user, idx) => (
          <li key={idx}>{user?.name}</li>
        ))}
      </ul>
    </div>
  );
}

export default App;
You can do a snapshot test on the LoadBtn component.
Install the React test renderer package;
npm install react-test-renderer
react-test-renderer will help us render the LoadBtn component to pure JavaScript objects that can be better captured as a snapshot without disrupting the DOM.
Update the src/App.test.tsx file with the test code below:
import { render, screen, fireEvent } from '@testing-library/react';
import axios from 'axios';
import renderer from 'react-test-renderer';
import App from './App';
import LoadBtn from './LoadBtn';

const fakeUsers = [
  {
    id: 1,
    name: 'Leanne Graham',
  },
  {
    id: 2,
    name: 'Ervin Howell',
  }
]
// mock axios module
jest.mock('axios');

it('loads user data successfully on btn click', async () => {
  // ARRANGE
  // override the axios get method with a mock implementation
  (axios as jest.Mocked<typeof axios>).get.mockImplementation(() =>
    Promise.resolve({
      data: fakeUsers,
    })
  );
  render(<App />);
  const loadUsersBtnComponent = renderer.create(<LoadBtn>Load  Users</LoadBtn>);
  let loadUsersBtnTree = loadUsersBtnComponent.toJSON();

  // ACT
  const loadUsersBtn = screen.getByText(/load users/i, { exact: true });

  // ASSERT
  expect(loadUsersBtn).not.toBeDisabled();

  // ACT
  fireEvent.click(loadUsersBtn);

  // ASSERT
  // snapshot test to ensure that the load btn UI doesn't change unexpectedly
  expect(loadUsersBtnTree).toMatchSnapshot();
  // get the h1 element in the DOM
  const listItemElements = await screen.findAllByRole('listitem');
  // assert that there are only two list item in the DOM
  expect(listItemElements).toHaveLength(2);
  // assert that the textContent of the first list item is same as the first fake user name
  expect(listItemElements[0].textContent).toBe(fakeUsers[0].name);
  // load user button should be disabled after users are loaded
  expect(loadUsersBtn).toBeDisabled();
});
Run npm test in your terminal to see the output of the above test. The snapshot test will fail if an existing or reference snapshot does not match the current snapshot, like in the below image:

Pressing u, in this case, will update the reference snapshot with the current one.
Wrap Up
Unit tests are undisputedly important in every software workflow, but it doesn’t end there, especially for React apps. Integration and end-to-end tests are two other types of tests to take into consideration to make you more confident in your code.
I hope this article has given you the needed insight into writing unit tests for your application. Kindly share if you found it helpful.
Thanks for reading😊.
Helpful Resources